


Anonymizing with Squid Proxy
To surf or not to surf - that is the question pondered by many employees before using the company Internet connection to check their stocks or follow the breaking news on the Net. And while many companies do not have a "no surfing" policy, it is reasonable to suspect that the security administrator is keeping an eye on the firewall logs; after all, that is his job, right?
The debate over the ethics of using an employer's system to surf the Net is ongoing. Employee privacy rights and whether or not the company owns the contents of employees' machines are just two facets of it. The opportunity for system administrators to view personal information disclosed through Web surfing may also pose serious security concerns, as many ill-designed Web interfaces embed the usernames and passwords in the URL string. Concealing the URL of a visited site from prying eyes makes a lot of sense. In such cases, the need for anonymous web access may well be justified.
Two Solutions: Web Anonymizers and Web Proxy Cache
So, how can this be accomplished? There are a number of anonymizing web proxies available online; however, these may not be the best option. The number of such services offered for free has decreased during the last year, likely due to dot-com bust (in a list of anonymizing Web proxies compiled by Electronic Frontiers Georgia only one link is still operational.) The most famous of them, The Anonymizer, still offers free service, but it does not conceal URLs - only the paid service offers this feature. Furthermore, using a known anonymizing service may attract the attention of systems administrators, in which case such sites would be blocked. Another prohibitive issue is trust. Why should one trust the owners of a web anonymizer service? After all, what is to stop them from disclosing the access logs - either deliberately or inadvertently due to bugs in the software.
While anonymizing solutions offered on the Internet may not provide adequate anonymity, a Web proxy cache will. Squid is a full-featured Web proxy cache designed to run on Unix systems. The software allows proxying and caching of HTTP, FTP protocols, extensive access controls, HTTP server acceleration, caching of DNS lookups and has many other features. Squid is distributed under free open source license. It has been chosen for this setup due to its popularity, quality of existing documentation and availability on most Linux distributions. It should be noted, that squid by itself is not an anonymizer and will provide no additional security to Web surfing.
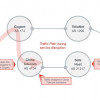
Squid proxy serves two useful functions: it redirects Web page requests to the Web server that the user wants to visit (called proxying) and it speeds up Web browsing by storing the frequently-visited pages (the caching function.) At the same time, it uses SSH port forwarding to enable encryption of all traffic between the web surfer and the proxy so that both web contents and requested URLs are encrypted with a SSH-supported encryption algorithm (such as DES, 3DES, IDEA, Blowfish for SSH1 and 3DES, Blowfish, Twofish, CA ST128 and RC4 for SSH2.) The only unencrypted communication will be performed on the local host interface, thus no plain text traffic will ever leave the office machine where the browser is used. On the client side, this method will be supported by the regular Web browser and the SSH client software (available for free for both Linux and Windows.)
Setting Up a Squid Web Proxy Cache
Let's proceed with the set-up, which will entail setting up a Linux system running Web proxy (Squid) and secure shell server (SSH) on a fast Internet connection outside of present location. A secure shell port forwarding feature is used to tunnel requests from the local Web browser to a remote Squid proxy in an encrypted fashion. Any Web browser for Windows or UNIX/Linux can then be utilized for secure Web access.
A certain degree of familiarity with Linux setup is assumed in the current document. Only one computer running Linux is required. Any version of UNIX will do, but the instructions that follow will apply to Linux. It is assumed that a fresh install of RedHat 7.1 is available. The specific Linux distribution and version are not important for the setup: RedHat Linux has been chosen as an example due to its popularity. The machine should be connected to the Internet through a high-speed connection such as cable or DSL. Technically, this is not required: a regular dial-up connection can be used, but the performance of our anonymizer proxy will suffer.
If the surfing is to be done from office, then the Linux machine should be installed at home location or elsewhere. RedHat offers three modes of installation: Server, Workstation and Custom. As the machine will be able to be used for purposes other than Web proxying, the most likely installation mode will be Workstation, which is also the best install option for the general purpose machine that will also be used for proxying. (This machine will also be called a server later in this paper, since it will work as a server for the connecting browser clients.)
As was mentioned, two pieces of software need to be installed on the server for the anonymizer to work: Squid Web Proxy Cache and Secure Shell Server by OpenSSH. Secure Shell server for UNIX by SSH Communication Security can also be used. Both Squid and OpenSSH server are included on the RedHat CDs, but are not installed by default on Workstation version of the set-up. Since RedHat Linux uses RPM (RedHat Package Manager) system, the installation of new software is extremely easy. One can use any of the RPM GUIs such as kpackage or GnoRPM or a good old "rpm -U" command. RedHat 7.1 includes Squid v. 2.3 and OpenSSH v. 2.5.2.
To install Squid Proxy Cache using command-line RPM, go to the RedHat CD and then to the RPM directory and run the command:
rpm -U squid-2.3.STABLE4-10.i386.rpm
If no error messages appear, that means that Squid has been installed successfully. If a message reading "the package is already installed" shows up, then no further action is needed.
To install Secure Shell go to the same directory and run:
rpm -U openssh-server*rpm
That installs the Secure Shell server package. SSH client has already been installed during RedHat installation.
A default configuration of Secure Shell server will be used. No changes to config files (located in /etc/ssh) are required.
Squid also will use default configuration (usually in /etc/squid directory). While some performance tuning might be a good idea, it is not required for the current setup.
Access Control and Security
The next important issue is access control and security. The access to Squid Proxy should be limited. It is recommended that all other network-visible services be removed from the machine. RedHat workstation configuration does not install any server daemons, so the out-of-the-box configuration is fine. It is highly recommended that the newly-installed RedHat box is portscanned with nmap or some other scanner to confirm that only Squid (default port 3128) and SSH server (port 22) are visible. Other services that might be installed by default are sendmail (port 25), X11 (port 6000) and bind (port 53). Those should be kept only if needed.
SSH access control can be set using TCP wrappers config files /etc/hosts.allow and /etc/hosts.deny. Access to the proxy machine should only be permitted from the browsing machine or network. Edit /etc/hosts.deny to have a single line ALL:ALL and make sure that /etc/hosts.allow contains a single line similar to the line below:
sshd: .good.network.com my.box.at.work.com
Squid access control only allows connection from the localhost. One might think that this is exactly what is needed, since the only machine connecting to Squid program will be the same Linux box; however, this is deceptive. Localhost is mapped to only 127.0.0.1 IP address and the requests will come from the real IP address of the local machine (assigned by the ISP). Thus Squid access controls (implemented as a set of Access Control Lists - ACLs - in /etc/squid/squid.conf) will have to be relaxed. Go to /etc/squid/squid.conf and add a line:
acl localweb src YOUR.HOME.IP.ADDRESS/255.255.255.255
to the part of the file where other ACLs are located, replacing the YOUR.HOME.IP.ADDRESS with the actual IP address. The line above creates a new ACL with a single IP of the home machine. Then add a line to actually allow access from the machine listed in the above ACL:
http_access allow localweb
just above the lines:
http_access allow localhost
http_access deny all
Now let's discuss client setup. Most likely, one would want to use Windows 9x/Me/2000 in the office. Users will need to download a Secure Shell client that supports port forwarding. The best choice is the SSH client from SSH Communication Security. The software comes as a standard Windows installation package and is free for personal use (that is what we have in mind, in this setup anyway.) Install the software according to instructions on the package. By now, the IP address or the hostname of the home Linux server machine should be known. Check the "ifconfig" command from Linux cmacnhien command prompt to learn the IP address.
Now let's deal with the Windows SSH client:
1. Start up SSH client and establish a connection to a server using the IP address learned above and any account you created on your Linux machine 2. Go to Edit -> Settings-> Profile Settings-> Tunneling 3. Setup Outgoing tunnel for port 3128, choose local port 3128 as well 4. Restart the connection to a remote Linux server for tunnel to be initiated
For UNIX client the following command will do the trick:
1. ssh -L 3128:squid.linux.server.com:3128 username@squid.linux.server.com
That also assumes that a valid account was created on the Linux server to be used with port forwarding.
Authentication
Now let's address the authentication issue. The above set-up for a secure shell client will prompt for a password every time before establishing a tunnel. Users can use public key cryptography to authenticate with a secure shell server. To make use of the public key authentication, user should create a key pair for authentication. The public key is then uploaded to the SSH server and private key is kept on the user client machine. To this setup, read one of the many guides available (such as http://mah.everybody.org/docs/ssh for Linux.) Note that some Windows SSH clients can have problems with public key authentication with OpenSSH version of Secure Shell. Now, the user can start using the automatic connection to the SSH server for remote access and port forwarding.
After the Secure Shell set-up is completed, the rest is simple. Depending upon the browser type, the user will need to enter location of proxy server. Keep in mind that due to port forwarding our Web proxy for the browser is 'localhost' and NOT the remote machine. This is due to the fact that the connection to the specified port on the local machine will be forewarded to the Squid Linux machine.
For IE 4.x and 5.x go to Tool->Internet Options -> Connections->LAN Settings, then check the box for "Use a proxy server" and enter "localhost" and port 3128 into the corresponding forms.
For Netscape Navigator 4.x go to Edit->Prefernece->Advanced->Proxies->Manual Proxy Configuration and enter "localhost" or 127.0.0.1 in the provided field.
Now, test the setup by going to a Web site. All the connections to the Web should be encrypted. If the browser hangs and does not connect, make sure that SSH client is running and connected to the Linux server. Now, what if the company does not allow outbound connections to port 22? It might mean that the user is not supposed to use SSH for remote access from company premises and that he or she should clarify the issue with whoever is responsible for security policy.
What are the limitations of such a setup? First, it's necessary that the ISP that hosts the home machine allow Secure Shell connections from remote location. Some cable ISPs such as AT&T Broadband allow connections to SSH, but not to port 80 (so that people don't run web servers on their home machines and to protect from CodeRed-like IIS worms.) Other companies can be more or less restrictive. Second, since the Web pages requests will go unencrypted from Squid to the Web server, the user should be sure that the ISP allows access to the web servers being accessed and that there are no issues with ISP knowing what sites are visited (the ISP will always know that). Third, some of the pages with dynamic content and slightly broken HTML can confuse squid into displaying not the newest version of the web page, but some locally stored version. This can be solved by tweaking the Squid configuration files. Check the Squid documentation for more details.
Other Solutions to the Anonymity Problem
Readers should note that there are a couple of other possible ways to achieve anonymity in Web surfing. First, one can use a special SSL wrapper (such as Stunnel from Stunnel.org) with the proper SSL encryption library to achieve the same result. However, the solution discussed in this article was intended to involve only commonly-used software (which Stunnel isn't) that can already be installed on the typical office machine. Second, if the home machine has Linux IPSec code (such as FreeSWAN from Freeswan.org) compiled into the kernel, one can use IPSec tunneling to secure the proxy connection. In this case, the user will use something like free PGPnet client from www.pgp.com. However, RedHat kernel does not have IPSec included (some other less well-known Linux distributions such as Connectiva or Polish(ed) Linux do) and thus the setup will involve kernel recompilation.
Conclusions
This article has offered a brief overview of how users can configure a simple but secure Web anonymizer using only commonly-used free software. Now Web surfing should be safe from the prying eyes on the local LAN. Readers should be reminded that the use of such set-ups may be prohibited in their workplace. Please, use the proposed setup responsibly without violating your company's ethical guidelines or security policy.