


A look at SNMP
Spectrum
SNMP Manager Part 1 of ManySimple
Network Management Protocol Is the standard network management protocol
in the TCP/IP environment.Are
you managing a network? Then you definitely want to be notified about
status changes of your WAN lines. You are interested in displaying the
utilization of both LAN and WAN. You'd like to have accounting statistics
of your Internet connection. Or you want to have a comfortable possibility
of watching other SNMP variables. What we are going to do is manage our
corporate network using only one of the many features of Spectrum software.
Currently I am running this product on a NT 4.0 Server with SP
5 on a PII 450 with 128 MB Ram over 100Bt.
This software is amazingly fast.
I am able to scan our local building in minuets and find out all
the networked devices including PCs, Printers, Routers, Switches, Servers,
Etc. This is a great tool for
troubleshooting your network as well as just monitoring new devices
added to your network.
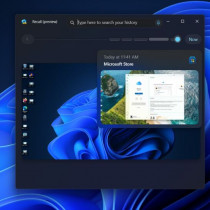
Above is
the main screen of the Spectrum software. From here we can do just about anything on
our network using SNMP. From here
we can ping devices, add devices, remove devices, etc. For today we are going to do a general scan on our network. To do this go to Tools from the File Menu and
Click on Discover Manager. When
the Discover Manager screen comes up select New from the list of options. All your scans will be stored here. This allows you to run multiple scans at once.
Or just save all your scans for future reference.
The software can keep scanning the same subnets you put in over
and over again until all your devices have been located.After
you click New on the Discover Manager Bar The following Screen should
appear. Enter in a Name for your
scan: this should be department, address or some way you will know which
subnet you are scanning. Entering
a description and notes can be even more helpful.
Now click
on Device and in Address Range click on New.
The screen below will popup. Enter in the starting and ending address as
well as your subnet mask. You
can add as many as you need to use for the scan by clicking new again
after you enter in your first range.
In Subnets
Click on New and enter in the information about your network.
When you
are finished with the subnets you need to enter in community names.
The following are pretty
much standard but your company might use a couple of extras.
Public$ might want to try your company name as well and also some variations of
the company name. Your company -
SNMP
After you
do your scan you can click on any item in the scan to get a detailed status
of that device. Most of the time
you will get at least the IP and Host Name. On Network devices you will get the Uptime,
MAC address, as well as type of device, brand, port information.
Below is
an example of a Switch the above is an example of a Router.
If you find an unsecure network it wont be hard to turn off ports
on your switch or even open and close ports on the router.
Even in some cases you can modify the routing table!!!
From
seclabs@NAI.COM Wed Nov 18
12:02:43
1998
From:
Security Research Labs To:
BUGTRAQ@netspace.orgDate:
Tue, 17 Nov 1998 12:45:35 -0800Subject:
NAI-30: Windows NT SNMP Vulnerabilities$ When the SNMP Service is installed, the default configuration that is provided
leaves the system vulnerable to attack.
In the default configuration the SNMP service answers to a single SNMP community ``public'', which is given read-write permissions.
The community is a name that is used much like an account name or
a password torestrict
who can access the SNMP functions and in what capacity. SNMP provides two
levels of access, read-only and read-write.
The Windows NT SNMP Service prior to Service Pack 4 does not allow
communities to be configured as read-only, so all SNMP communities have
the ability to write. If the SNMP Service is reconfigured with a more secure
community name, the system is still vulnerable to attack from users with
an account on the system. The SNMP
Service parameters are stored in the registry and are readable by all users.
A user with an account on the system can read the list of configured
community names and use the community name to access the SNMP Service.
With write access to the SNMP community, a user can perform actions
that are usually restricted to users with privileged access.
In
addition to restricting access to a list of community names, the Windows
NT SNMP Service has an option to restrict access to a list of IP addresses.
Although this may seem to provide a way to limit exposure to attacks
from unknown systems, it is not very effective. The SNMP protocol uses
UDP packets to exchange commands and their replies.
Because the UDP protocol is connectionless, forging the source
address of command packets is trivial.
SNMP ``set'' operations can be sent with any source address since
the reply is not needed. Restricting the set of addresses that can communicate
to the SNMP service is not effective at preventing malicious ``set'' operations
if the attacker knows which addresses are allowed to communicate with
the SNMP service. Like the community
name, the list of addresses that can communicate with SNMP is stored in
the community and accessible to users with an account on the system.
IMPACTRemote
individuals with network access to a machine running the Windows NT SNMP
Service can query and set any of the system management variables that are
supported. Information that can
be queried includes:
- the LAN Manager domain name
- a list of users
- a list of shares
- a list of running services
- a list of active TCP connections
- a list of active UDP connections - a list of network interfaces and their associated IP and
hardware addresses
- the IP routing table and the ARP table as well as a number of
networking performance statistics.By
setting variables, an attacker can modify the IP routing table and the ARP
table. An attacker can also bring
interfaces up and down and set critical networking parameters such as the
default IP time-to-live (TTL) and IP forwarding.
These settings allow an attacker to redirect network traffic, impersonate
other machines or deny the machine access to the network.The
ability to modify the routing table, and enable IP forwarding on an NT host
is especially dangerous if the host is a firewall with SNMP enabled.
RESOLUTION
Service
Pack 4 (SP4) provides a solution to this problem by adding access control
and allowing communities to be configured READ ONLY, READ WRITE or READE
CREATE. By default, when Service
Pack 4 is installed, the permissions will be set to READ CREATE, which still
allows modification of SNMP entries, and therefore does not close this vulnerability.
Ensure that the communities are configured READ ONLY to prevent modification
of SNMP entries.To
configure the SNMP service go to:
"Control Panel" -> "Network" -> "Services"
-> "SNMP Service"-
From this window, select the "Security" tab.
Once within the security tab, the security settings of each community
name can be configured. It is recommended
that each community name be configured READ ONLY unless otherwise required.The
permissions on the SNMP registry key allow "Everyone" access by
default. This access allows any
system user to obtain the community names utilized by the SNMP service.
The permissions on this registry key should also be set more strictly
by the Administrator. Ensure that
only Administrator and other authorized users can access the contents of
the following registry key:Hive
: HKEY_LOCAL_MACHINE
Key
:
SystemCurrentControlSetServicesSNMPParameters
On
NT 5.0, the permissions on this key will be set securely by default.Ensure
that the community name is changed from the default "public" community
name to a more obscure name.
Block
SNMP access at your firewall or border router.
SNMP utilizes UDP port 161.
Just
think you can have a snapshot of your entire network every morning when
you get to work just by adding the built in schedule tell Spectrum to scan
your whole network an hour before you get in.
Just think how it will look when you show up to fix problems before
it reaches the helpdesk. I will
add more sections to this because Spectrum has many other features than
just scanning your network.
1.)
HardAttack
: Review of Gateway Microserver -
L33tdawg
2.)
Setting up
a DHCP server (Part 2) -
L33tdawg
3.)
WINS
vs DNS -
Haven
4.)
Self
Actualisation through broadband
- L33tdawg
5.)
Somebody
loves you - an analysis of the ILOVEYOU Worm -
Black Hand
6.)
Distributed
Tools -
sasha / lifeline
7.)
Fun
with Windows (Part 2) -
xearthed
8.)
Inside
the box : Comparison of Linux distributions
- Liquid Sphear
9.)
A look at
SNMP
- Haven
10.)
Things
to do in Ciscoland when you're dead
- gauis
11.)
Future
of Viruses
- Cpt ZZap